Sunday, July 8, 2012

Caramel Marshmallow Popcorn

There are some days where you just need a treat. You know those super long, frustrating, I've had it with life kind of days? Yep. One of those. With two small children, I've had my fair share of frustrating days. Once I get my little munchkins down for bed, occasionally I'll make a quick batch of this tasty popcorn and sit down with my hubby and watch a show and snuggle on the couch. It's the perfect quick treat. Thank you pinterest for the recipe!


Caramel Marshmallow Popcorn
(Recipe originally found on Pinterest. I tried to locate the actual site that the recipe had come from, but couldn't find it. I found a lot of similar ones, but not quite the same...)

Ingredients


12 cups popped popcorn (1 regular sized bag of microwave popcorn)
1/2 cup brown sugar
1/2 cup butter
10 large marshmallows (not those new super sized, as large as my face ones ... just the old large ones)


Directions: 
(Microwave times may vary depending on your microwave. These are what worked for me)


1. Pop the popcorn
2. In a microwave safe bowl, melt the butter and brown sugar for 2 minutes. It should be bubbly and looking like caramel.
3. Add the marshmallows and cook until melted. My microwave only took 1 minute, but the recipe said 2-2 1/2 minutes. Just keep your eye on it. You don't want to over cook the marshmallow and have it super tough
4. Pour over popcorn and mix well. Try to avoid kernels when you put the popcorn in a bowl, they aren't very fun to randomly bite into. :)
5. Wait about 5 or so minutes and dig in!


Friday, July 6, 2012

Vegetarian (or not) Tin Foil Dinners

When camping in the summer, or even quick dinners at home, I love tin foil dinners! They are so easy and you can easily customize them per person. As a vegetarian, I'm always looking for delicious and filling ideas for tin foil dinners. Most of them I've seen are pretty basic meat and potato varieties. While looking around, we stumbled across this recipe. I've made them a few different times, and they are pretty tasty!


Gourmet Vegetarian (or not) Tin Foil Dinners
(Original recipe found at theveggie-fullkitchen.blogspot.com. The recipe can be found here)

Basil Balsamic Marinade
1/4 cup olive oil
1/4 cup balsamic vinegar
2 cloves garlic, minced
1/4 cup fresh basil, chopped
1/4 tsp salt
1/4 tsp ground black pepper

Directions:
Combine ingredients and whisk until incorporated.

Tin Foil Dinners
Basil Balsamic Marinade
1 red bell peppers, chopped into bit sized pieces
1 zucchini, sliced into bite sized pieces
8 oz. baby bella mushrooms, sliced (or white button mushrooms work well too)
1/2 large onion, diced
16 ounce bag of frozen, southern style hash browns, thawed
Salt and pepper to taste
**Optional: Chicken, cubed. (My husband and children like chicken in theirs, so I double the basil marinade when I make it and marinate the chicken in one bag and the mushrooms in another)

Directions:
1. Combine the marinade and the mushrooms (and chicken if you want it) and allow to sit in the refrigerator for about 1 hour.
2. Tear approximately 12 inch sheets of aluminum foil
3. On the dull side, layer the potatoes. Season with salt and pepper. Add the bell peppers, zucchini, onion and mushrooms (and cubed marinated chicken if you want it).
4. Drizzle a little of the leftover marinade over the top.
5. Fold the aluminum foil in half and roll it down tightly to keep any steam in. Do the same on the remaining two sides.
6. Cook in a fire pit on coals or briquettes. 
7. Cook for about 20 minutes or until they are cooked through. The time will vary depending on how hot your coals are and how full your packets are.
8. If you want to bake your foil dinner in the oven, bake it in a preheated 350 degree oven for about 20-25 minutes.
9. Enjoy!

Friday, June 29, 2012

Stuffed Zucchini

Zucchini season is just about here, and I know I need all the zucchini recipes that I can get my hands on! I know this isn't the best picture, but these were really tasty!


Stuffed Zucchini 
(Original recipe on www.kayotic.nl/blog. The recipe can be found here)

Ingredients:
1 Tbsp sour cream
1/4-1/2 tsp salt
Mesquite seasoning
1/2 tomato
1 tsp thyme
2 zucchini's
1 onion
cheese
pepper

Optional: Bacon

Directions:

Preheat your oven to 400 degrees.

Give the zucchini a good scrub and then slice them in half lengthwise. You can trim the ends if you like. I didn't, I like them to stay whole. They hold together better.

Scoop out the zucchini guts and set aside. Leave about 1/2" of the flesh inside, or they will get pretty flimsy. 
  
Chop up the zucchini pulp, onion and half a tomato. The recipe uses the tomato more for the color than the flavor. If you use too much of the tomato, it might get a little too runny.

Saute the onions in about a tablespoon of butter or olive oil. When the onions are nearly finished, add the mesquite seasoning and cook everything for an additional 30 seconds. I would go easy on the seasoning, a little goes a long way. You can always add more! When they are done, transfer them to a big bowl. 

If you wanted to add bacon, cook that now in the pan you just used for the onions. If you would rather not, then just skip this step. The original blogger said she liked the crunch and saltiness that the bacon added.

Now add the remaining ingredients (minus the cheese) to the onions. 1 tsp dried thyme, 1/4-1/2 tsp salt, 1 heaping tablespoon sour cream, a good pinch of pepper, the zucchini pulp, the tomato and crumble the bacon in if you cooked some.

Lightly butter or spray a baking dish and put the zucchini boats in the dish. Grab a spoon and fill the shells with the mixture. Sprinkle some cheese on top.

Put them in the preheated oven and give them about 20 minutes and then turn on the broiler until the cheese is golden brown. Sprinkle some parsley on top and you are done!


Wednesday, June 27, 2012

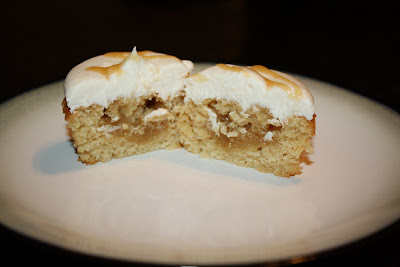
Triple Salted Caramel Cupcakes

Sadly, a couple of weeks ago my hard drive crashed taking with it all of my email (which had a folder full of recipes!) and everything else I needed to work. Luckily, all of my photos were saved on my external hard drive! I just got it back up and running again, it needed a new hard drive, and it is much happier now! To celebrate, I thought I'd post a recipe for some DELICIOUS cupcakes! Seriously, if you like caramel, you will love these. They are amazing. They are a little time consuming, but well worth the effort!


Triple Salted Caramel Cupcakes
(original recipe can be found at www.sprinklebakes.com)

Cupcakes: 
 1 1/2 cups all-purpose flour
1 tsp baking powder
1/4 tsp sea salt
1 stick of unsalted butter, room temperature
1 cup plus 2 tablespoons packed light brown sugar
2 large eggs, room temperature
1 tsp vanilla
1/2 cup plus 2 tablespoons buttermilk

Preheat oven to 325 degrees. Line muffin tins with papers.

Combine flour, baking powder and salt. Set aside.

Cream butter and brown sugar on medium-high speed until pale fluffy. Add eggs, one at a time, beating until each is incorporated. Add vanilla. Mix and scrape down sides of bowl as needed.

Add flour mixture in three batches, alternating with two additions of buttermilk, and beating until combined after each.

Divide batter evenly among lined cups, filling each about halfway full. Bake for about 25 minutes. When done, transfer pans to wire racks and cool 10 minutes. Turn cupcakes onto racks and let cool completely.

Salted Caramel Filling:
1/2 cup sugar
3 tablespoons salted butter, cubed
1/4 cup plus 1 tablespoon heavy cream, at room temperature

Melt the sugar over medium high heat in large pot. Whisk the sugar as it melts and cook until it becomes a deep amber color. Add the butter and stir it in until melted. Pour in the heavy cream (mixture will foam) and whisk until you get a smooth sauce. You may have some lumps, but keep stirring until they have melted. Remove from heat and let cool slightly. 

Cut a small round piece out of the tops of each cooled cupcake and pour in 1 teaspoon of caramel. Replace the cake piece and set cupcakes aside. 


Salted Caramel Buttercream Frosting:
1/4 cup granulated sugar
2 tablespoons water
1/4 cup heavy cream
1 tsp vanilla extract
1 stick salted butter
1 stick unsalted butter
1/2 tsp sea salt
1 1/2 cups powdered sugar

In a saucepan, stir together granulated sugar and water.  Bring to a boil over medium high heat.  Cook without stirring until mixture turns a deep amber color.  Remove from heat and slowly add in cream and vanilla, stirring until very smooth.  Let caramel cool for about 20 minutes, until it is just barely warm and still pourable.

In a mixer fitted with paddle attachment, beat butter and salt together until light and fluffy. Reduce speed to low and add powdered sugar. Mix until thoroughly combined.

Scrape down the side of the bowl and add the caramel. Beat on medium high speed until light and airy, and completely mixed (about 2 minutes). Mixture should be ready to use without refrigeration. If your caramel was too hot when added, it will cause your icing to be runny. If this happens refrigerate for 15-20 minutes. 

Top caramel-filled cupcakes with frosting. 


Monday, May 21, 2012

Grilled Balsamic-Garlic Marinated Pork Tenderloin


Grilled Balsamic-Garlic Marinated Pork Tenderloin
(Original recipe found at www.kitchenconfidante.com. The recipe can be found here)

 Ingredients:
1 pork tenderloin
4-5 garlic cloves, minced
2 Tbsp balsamic vinegar
2 1/2 tsp coarse salt
1/2 tsp pepper
2 Tbsp olive oil
2 Tbsp canola oil (if preparing in oven)

Directions:
Stir together garlic, balsamic vinegar, salt, pepper, and olive oil in a small bowl. Put in large ziplock bag and all the pork. If you have the time, marinate overnight. If not, let it marinate for at least an hour. It will still be great!

Grill preparation:
Sear the tenderloins on all sides, then grill for about 20-30 minutes, rotating every 10 minutes, until the internal temperature is 145-150 degrees. Let it rest for a minimum of 5-10 minutes before slicing.

Oven preparation:
Preheat oven to 400 degrees.
Heat canola oil in a large, heavy saute pan over medium-high heat. Add pork, and brown all over, about 4 minutes.
Transfer pan to oven. Roast pork, turning occasionally, until the internal temperature is 145-150 degrees, about 15-20 minutes. Transfer pork to a cutting board, and let it rest 5-10 minutes before slicing.


Here it is sliced ... 


Ingredients:

Wednesday, May 2, 2012

Roasted Cabbage

Throughout the year, my bountiful basket comes with a lot of cabbage. I try and go through it as quickly as I can, but I can only make so many cabbage salads and cabbage slaw's before I get bored. I decided to make it as a plain old vegetable side dish. I chopped it up in large chunks and left the core to hold it together. I put it on a baking dish and roasted it until it was just barely crispy. It was delicious! Even my husband loved it. I will definitely be making more with my plentiful cabbage heads in my baskets this year.


Roasted Cabbage

Ingredients:

1 head cabbage
Olive oil
Kosher salt
Pepper
Garlic powder

1. Pre-heat oven to 400 degrees.
2. Chop up the cabbage in large chunks. Make sure to leave the core so the cabbage doesn't fall apart.
3. Drizzle with olive oil. Sprinkle with salt, pepper and garlic powder to taste. Toss to coat.
4. Arrange cabbage on a baking sheet and roast until the edges are just crispy, roughly 20 or so minutes. Just keep checking on it.
Serve warm!

Monday, April 30, 2012

Seriously Delicious, Extreme Chocolate Chunk Brownies

 Okay, I need to admit something. I prefer boxed brownies over homemade. There, I said it. Every homemade brownie I've ever had has sadly just been a little dry and disappointing. It just doesn't make me want to eat a second one. I stumbled across this recipe and the original blogger posted that she also prefers boxed brownies, but fell in love with these! I knew at that point, I had to try them.

I kid you not, these (remember, I don't generally like homemade brownies) are so good! They beat out boxed brownies, by a LOT!

I've made them a few times now, and each time I've served them, they've been a huge hit. If you like chocolate, try them. You'll like them.


 "Good Ol' Homemade Brownies"
(Recipe found at bunsinmyoven.com. Original recipe can be found here)

Ingredients:
1 cup (2 sticks) butter
2 1/4 cups sugar
4 large eggs
1 1/4 cup cocoa powder
1 tsp salt
1 tsp baking powder
1 Tbsp vanilla extract
1 1/2 cups all-purpose flour
2 cups semi sweet chocolate chips
Powdered sugar for dusting

Instructions:

1. Pre-heat the oven to 350 degrees. Butter or spray a 9x13 baking dish.
2. In a small saucepan over low heat, melt butter completely. Stir in sugar and continue cooking for 1-2 minutes, stirring constantly. Do not allow sugar mixture to boil. 
3. Pour butter mixture into a large bowl or stand mixer, beat in cocoa powder, eggs, salt, baking powder and vanilla extract. Mix until well combined. 
4. Stir in the flour and chocolate chips until well combined.
5. Pour into prepared pan and bake for about 30 minutes, until a tester comes out mostly clean. (Sometimes mine can take up to 10 minutes longer). The edges should be set and the center should still look slightly moist, but not uncooked. Cool on a wire rack.  
6. Top with powdered sugar and enjoy!


Related Posts with Thumbnails